If you would like to use Assets for your operation, let us know here.
Whether it's equipment, machinery, or chemicals, Onside is now your go-to place to keep on top of managing your assets. Read on to get started or have a watch of the video below.
Note: You need to have an Onside Complete or Enterprise subscription and advise our support team to enable this feature.
Creating categories
Before we jump in and start adding assets, let's lay the groundwork for your asset register - Categories. By adding categories, you'll be able to better manage your assets and the information associated with them.
- Click on 'Assets' in your sidemenu, then the 'Categories & fields' button.
- Click '+ Add new category'.
- Give your category a name and description.
You also have the option of connecting it with another category. An example of this might be you have a fire extinguisher in an 'Emergency equipment' category, but the parent category is 'Farm Equipment'. - Next, choose the fields for this category. Some of them, such as name and images, will be included automatically, but, you can add your own.
Scroll down to Custom fields, click 'Select', then 'Create new', give it a name, and choose what kind of field it will be.
When creating custom fields, you can also choose "Only editable by people with 'Full edit' access". This is to create a "Limited edit" field. More on that in the permissions section below. - Save your category.
- Run through the steps again to create all of the categories you'll need.
Setting permissions
Depending on the type of user checking in to your property, you may want to lock down or open up access to your assets. You may want to give edit access to all staff, but contractors should only have view access to some of your assets. This is completely configurable as to how you need to run your operation.
Tip: You can apply permissions to individual assets as well as asset categories
Click to the 'Settings' button on your asset page and navigate to your 'Permissions' tab.
From here the permissions can be broken down as follows;
Standard roles
- Company admin
By default, all company admins have full access to assets within the account - Property admin
Permissions for the assets connected to the properties they're admins of - Property member (team member)
Staff who are part of team(s) linked to properties in your account - Responsible person
Every asset can have an assigned responsible person. This person is also told when issues have been reported. - Company member
Any staff member in your 'Internal staff' list - Anyone
Teams
Set permissions for individual teams you have created in your account.
Individual users
Set permissions for individual staff members from your account.
External companies
Set permissions for companies external to your own, such as; contractors, visitors, or clients.
The permission options you can set for all the user types listed above are:
- None (cannot view)
- View (can view in the app, cannot edit)
- Limited edit (can view in the app and edit only specific fields)
- Full edit (can edit and view every part of an asset and can manage assets in the web portal)
Tip: If you see 'Inherited permissions' in an asset's 'Permissions' tab, it means that asset already has permissions set from your default asset permissions (Found in Asset 'Settings' > 'Permissions'). Click on 'Inherited permissions' for a breakdown of how it applies.
Request access
Users can also request access to a specific asset by scanning its QR code and choosing 'request access', as well as adding a comment for context. This then triggers a notification to the responsible person for the asset to approve. If there is no responsible person set, it will notify the property admins. If there is no linked property, it will notify the company admins.
Adding assets
With your categories now created, it's time to add your assets.
- Navigate back to your Asset dashboard and click '+ Add'.
- Add the details of the asset; unique identifier, property, responsible person, and most importantly, category. When a category is chosen, more specific information can be added, as covered in the steps in the previous section.
- Complete the details associated with the category.
- Click 'Save'.
Just like that, you've created your first asset.
 Once created, your assets will have their own unique QR codes which can be printed and fixed to your assets, allowing for quick scanning and access to the asset's information.
Reporting issues
If something comes up with one of your assets, staff will be able to immediately let the right people know from the Onside app.
After tapping on 'Report asset issue' and entering a bit of information, a notification will be sent to that asset's "Responsible Person", advising them what has happened. From the web portal, the responsible person can then follow up on the issue and mark it as resolved once it has been sorted out.
Assets with reported issues can be easily identified by a ![]() symbol in both the Onside app and asset dashboard. Resolved issues will be recorded in the activity log of the asset.
symbol in both the Onside app and asset dashboard. Resolved issues will be recorded in the activity log of the asset.
Asset links
The true power of having assets in Onside comes with being able to link with other key parts of your operation, complementing and completing your H&S and asset management. Take a look below to see what this means for your business.
Link assets to Documents
From your asset's documents tab, upload a new document or link to a document you've already uploaded in your 'Documents and forms' page. You can also create a document from scratch directly in Onside.
One of the key advantages of storing documents in Onside is document versioning. If your document needs updating, you can simply upload a new version and immediately all linked assets will receive the updated version.

Link assets to Tasks
From your asset's Tasks tab, you can create a linked task. If the task already exists, simply use the 'Link' button and do a quick search for your tasks. You can also link directly from the task page or while creating the task.
Your asset will also have a mini task dashboard to keep on top of all linked tasks, check statuses, and check off tasks.

Link assets to Properties
You can link assets to specific properties so your staff can access them after checking in to that site, or any time if they are part of that property's team. In doing this, your staff will also gain access to the forms connected to the assets, such as pre-start checks.
Property admins can manage assets from this page, as well as add new assets. To associate existing assets, a Company admin will need to link the asset to the property.

Link assets to Forms
Build your own custom forms to capture asset information and streamline processes such as vehicle pre-starts and maintenance.
In the same way you link documents, from the 'Documents' tab of an asset you can also link your asset to forms you've already created. If you haven't created your form yet, you can click 'New document' and 'Create form' from this screen to start creating your connected form. Take a look at our Forms guide for more information on that.
Link assets to Incidents
From your asset page in the web portal, simply navigate to its 'Incident' tab to create an incident to link, or simply choose an existing one.
You can also link assets from the 'Details' page of individual incidents.
Download reports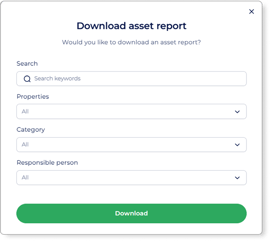
Accessible from the ![]() button of the Asset dashboard. A pop up will appear for you to narrow down how you would like your asset report generated.
button of the Asset dashboard. A pop up will appear for you to narrow down how you would like your asset report generated.
You can filter by
- Any search keywords
- Properties
- Category
- Responsible person
Asset reminders
To help you stay on top of managing your assets, you can set reminders based on what's happening with your category fields. Stock running low for chemicals? Automatically send notifications to the person responsible for the asset based on when the quantity goes below a certain level. Vehicles coming up for rego renewal, servicing, or RUCs? You can set tasks to be automatically created based on dates too.
Click on one of your assets and navigate to the 'Reminders' tab to start setting up your automations. Then, select the field to base your reminder on and configure to how you need. You'll be able to choose between 'Create task and notification' or 'Notification only'. These are sent to the "Responsible person" for that asset.
If you create a task, you can also base that task on a task template you've created in your account. More on that here.

Tip: Once an asset reminder has been created, from the ![]() button of the reminder in the 'Reminders' tab of the asset you can copy it to other assets or even categories.
button of the reminder in the 'Reminders' tab of the asset you can copy it to other assets or even categories.
Offline functionality
Your company's assets are available offline, as they're downloaded to your phone as part of the app's install process. This may take a few minutes while in wifi connection, depending on the number of assets however.
Other company's assets that you interact with will require an internet connection to access, as this information has not been saved to your phone.
If you have any questions or need any help, you can reach us on 0800 ONSIDE (NZ), 1800 112334 (AU), or email Support@onside.co
If you have an idea for an improvement to Onside, you can add it directly to our product board.