![onside-logo 1.png]](https://info.onside.co.nz/hs-fs/hubfs/onside-logo%201.png?height=29&name=onside-logo%201.png)
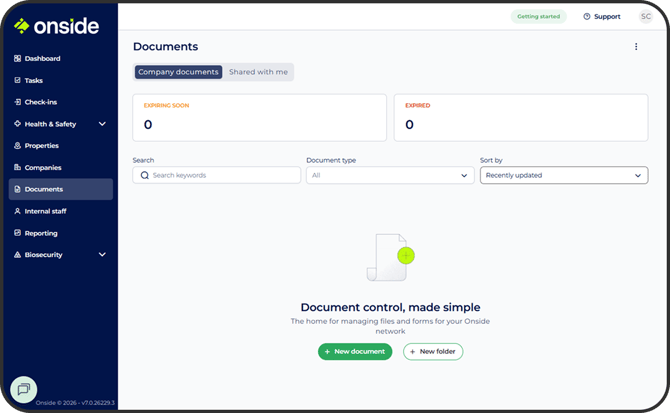
Located in the side menu of the Onside web portal, company admins are able to store and manage important documents and files, which will be accessible by other company admins.
Storing documents in Onside will mean you can
- Create folders
- Update document versions
- See any changes made to the documents
- Share with your clients and contractors
- Give access to your staff
Have a watch of the video below for a full walkthrough of using Documents in Onside. Alternatively, have a read of the guide further down the page.
Using folders
Before you start adding your documents, it's best to have a think about how you want to manage your documents in Onside. This is where folders come in.
Folders are done a bit differently in Onside. The documents you add to Onside can exist in as many folders as you need, but rather than creating copies to have in each folder, there is only one document and you associate it to each folder. The best part of managing your documents in this way is that changes to documents can be done in one place. Need to update your document version? Easy, no hunting down duplicates or copies.
To create a folder, click 'Documents' in the side menu, then the green 'Add' button and 'New folder', then give it a name. You can also create folders within folders - Subfolders.
You can also share folders with these steps:
- Click on the folder then the white 'Requests' button
- Click 'Send folder'
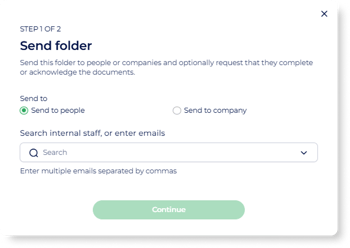
- Click on the document and go to the green 'Send' button in the top right of the page (or from the quick access 3-dot button)
- Click 'Send to people' or 'Send to company' and select from the list or type the email. If the company name is not showing, add the company from the 'Company' page first
- Once you're happy with the list of recipients, add a message to give more context. You can also set if they need to acknowledge the document, as well as by when.
So how might you use this?
You may have all your H&S documents in your Onside account, but only some of those documents should be shared to contractors. You could create a folder for those documents, then make it accessible to all contractors.
Adding documents
Adding a document is as easy as dragging the document onto your Documents page, or clicking the '+ Add' button. You can upload multiple documents at once too. Alternatively, you could create the document entirely in Onside, see how here.
Once you've uploaded your document(s) you'll need to add a few details.
.png?width=620&height=337&name=Upload%20files%20(1).png)
- Select the document from the left
- Add or change the title
- The version number will default to V.1, but you can change this to suit how you manage document versions, or start at a higher version number
- Choose the folder(s) you created earlier
- Set an expiry date if you know when you would need to review the document. You'll be reminded a month before the document expires.
Note: To get reminders for document expiries, you must set who gets these notifications. - Click on the next document from the left and update its details, or click 'Publish document' if you're done.
Managing your documents
The 'Expiring Soon' and 'Expired' cards will help you keep on top of managing your documents, but they're also filters which apply to your documents and folders. Go on, give them a click. You've also got the option of filtering by name, document type, and by last change.
If you've been sent documents or forms by another Onside company, you can easily access them by clicking on the 'Shared with me' toggle.
Updating documents
When you're ready to edit, update, review, delete, or send a document, click on it to see a details page like this. You can also click on the 3-dot button for quick actions.
.png?width=670&height=413&name=Individual%20document%20page%20(2).png)
- Preview your document by clicking on the image under the name
- Upload a new document version. This will update the document in all of the folders it's part of
- Archive or delete the document from the 3-dot button
- Keep up to date with the version changes from the 'Versions' tab
- Review every change from the 'Activity log'
- Set an expiry date for the document to automatically notify who has been set up here.
- Choose if the document should be related to an asset, a property, or both. Doing so will make the 'Assets' and 'Properties' tabs to appear for you to link the appropriate for each.
- Tick the 'Enable acknowledgement' box if you'll be sending the document to people or companies and require them to prove they've opened and read it.
Setting permissions and access
Each document and form will have a 'Permissions' tab for you to configure who should be able to view, submit, or edit documents and forms. By default however, property team members will be able to access the documents linked to their respective property.
Depending on the type of user checking in to your properties, you may want to lock down or open up access to your documents. You may want to give view and submit access to all staff, but contractors only access to a specific folder. This is completely configurable as to how you need to run your operation.
You can also set these permissions at a form level or an entire account level by clicking on the 3-dot button at the top right of the Documents page and selecting 'Permissions'.
From here the permissions can be broken down as follows;
Standard roles
-
- Company admin
By default, all company admins have full access to all documents within the account - Property admin
Permissions for the documents connected to the properties they're admins of - Property member (team member)
Staff who are part of team(s) linked to properties in your account - Company member
Any staff member in your 'Internal staff' list
- Company admin
-
- Anyone
Teams
Set permissions for individual teams you have created in your account.
Individual users
Set permissions for individual staff members from your account.
External companies
Set permissions for companies external to your own, such as; contractors, visitors, or clients.
The permission options you can set for all the user types listed above are:
-
- None (cannot view)
- View and submit (can view, but cannot edit)
- Full edit (can edit all fields, create new versions, and view all activity)
Expiry notifications
Expiry notifications can be set at a company, folder, and individual document level.
For each level, follow the steps below on the respective pages (Documents page, folder page, individual document page).
- Click on the 3-dot button to the left of the green button at the top right of the page.
- Click Notifications
- Add the users you'd like to get expiry notifications
Sharing documents to other companies
With the Documents feature you'll be able to send your stored documents directly to your contractors and visitor's companies. They can also send documents back to you. If this sounds perfect for your operation, click here to see the document sharing guide.
Showing documents on check-in
If you're wanting to make PDFs or images available to anyone when checking in to your property, you can use the Check-in Rules feature.
If you have any questions or need any help, you can reach us on 0800 ONSIDE (NZ), 1800 112334 (AU), or email Support@onside.co
If you have an idea for an improvement to Onside, let us know here.