![onside-logo 1.png]](https://info.onside.co.nz/hs-fs/hubfs/onside-logo%201.png?height=29&name=onside-logo%201.png)
The Onside Forms feature is one of our latest improvements and it goes far beyond the name. With this feature you have full creative freedom to create customised documents, checklists, forms, toolbox meetings, and questionnaires. You are in control of how you collect important information for your business.
Note: You need to have an Onside Complete or Enterprise subscription and advise our support team to enable this feature.
You will need to be a company admin to create forms and upload documents
Below are just a few examples of how you could use Onside Forms. We're excited to see all the creative uses for Forms our users come up with.
Vehicle pre-start checklist
Contractor prequalification form
Asset use questionnaire
If you'd like a video to share with your staff on using forms and documents in the app, check out our Helpful Highlights video.
Create a form
- Click on 'Documents' in the side menu, then the green 'Add' button on the right
- On the pop-up that appears, select 'New Document' then 'Create form'
- Give your form a name, optionally a description too
- If your document/form is going to relate or connect to an asset, tick the 'Asset selection is required' box. You can also make selecting a property mandatory.
- Your document/form can have multiple pages, and how you lay these out will be important for readability for the person accessing it. In some cases, you could use each page as a way to create sections. Each page will also need a title.
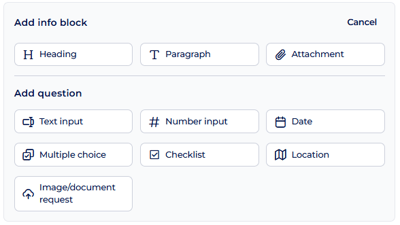 Now for the details.
If you need to add more information or context to the page, add a heading, paragraph, or attachment, then follow up with your questions.
The question options shown (right) are for how the user can respond.
With 'Location' for example you can ask a question and the response from the user will be a location pinpoint, whereas with 'Image/document request' you can ask for a specific document or picture, and the user will be able to upload it. You can also choose to make their response required.
Keep adding questions until you're finished with the page or section. Click the '+ New page' button to the left of your form to start working on your next page. You can also re-order your pages from there by dragging the page name up or down.- Once you're happy with what you've created, click 'Preview' to see how users would interact with the form. At any time you can save the form as a draft and come back to it later.
- Once you've done your final checks and are ready for the form to be used, simply click 'Publish'. If find you can't publish your form, make sure none of your questions have a red border around them. This is to advise of missing information.
Note: You won't be able to connect your form to assets or properties or set follow up actions until it is published.
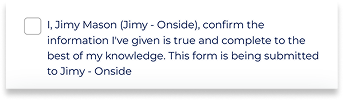 For added peace of mind, at the end of every form there is also a disclaimer that needs to be agreed to by the person completing the form (shown right).
Visibility logic
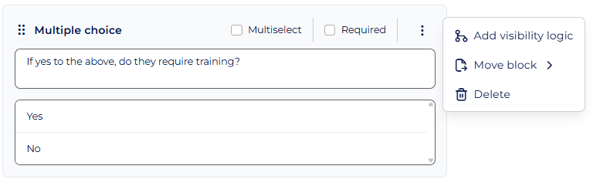
There will be some questions that you need to ask in your forms that depend on the answers of other questions. Usually they look something like this "If yes to the above...". With visibility logic you can set those questions to show only when they're relevant.
Add visibility logic from the 3-dot button to the right of your questions.
Note: Only Multi-choice questions can be used to trigger visibility logic.
Sending forms
Once you have your form set up and ready to go, you can send it to staff, contractors, or individual people to complete.
Click on the form and go to the green 'Send' button in the top right of the page (or from the quick access 3-dot button).
Firstly, chose who you'd like to send the form to. You have 3 options and you can send to multiple at the same time;
-
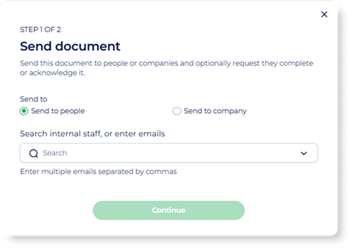 Staff - Select 'Send to people' and the dropdown list will be the staff already added to your company.
 -
Individuals - Send to individuals external to your company by simply typing in their email addresses.
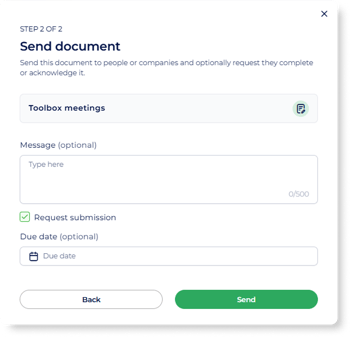 Companies - Your Onside portal has a 'Companies' page in your side menu. This is specifically for you to build up a list of companies you work with. For accounts that manage properties, that will be contracting companies, but for contractors themselves, these could be clients or subcontractors.
Note: The company must be added to the list before you can send forms to them.
Once you're happy with the list of recipients, add a message to give a bit more context, and you can also set if they need to complete and submit the form, as well as by when.
Follow-up actions and notifications
Forms capture critical operational, safety, and compliance information, so having automated follow-up actions, such as notifications to managers when specific responses are submitted helps teams respond faster and reduce manual follow-up.
Once you have created and published a form, start in the 'Follow-up actions' tab of the form details, first you choose what you want the automate action to be:
-
Send notification - This can be a notification to the person submitting the form, the managers of the site it's connected to, the responsible person of the connected asset, or even a specific person within the account. An email like this will also be sent
-
Create a task - This could be a task based on a template or a brand new one, and it can be assigned to the person submitting the form, the property managers of the site it's connected to, the responsible person of the connected asset, and even set when it's due. When assigned a task, the assignee will be sent a notification and email.
-
Update an asset field - If an asset is connected to the form, you'll be able to update the field however you like, or automatically add/update the field with the answer given to the trigger question.
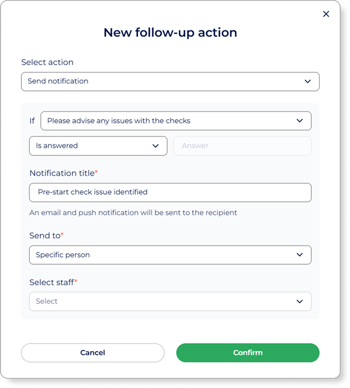 With the action chosen, you then need to set what will trigger the action:
-
Form submission
-
A question has or hasn't been answered
- A question has been answered in a specific way
In the example to the right, I can set an Onside app notification to a specific staff member when someone has advised there are issues found when going through a vehicle pre-start check.
Forms links
Link forms and documents to assets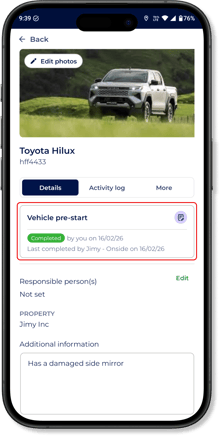
Linking forms and documents to assets can quickly be done from the 'Documents' tab of an asset. If you haven't created your form or uploaded the document yet, click 'Link' then click 'New document' and choose to upload your document or 'Create form' to enter the form builder.
Once a form has been connected to your asset, it can be accessed and completed from the Onside app (see right) by scanning your asset's QR code, from 'Company assets' in the 'More' tab for your company members, or from the property page for team members. Documents can be found in the 'More' tab of the asset in the app.
You'll be able to see the last time you completed the form, as well as your colleagues. Saving on double work, such as daily pre-start checks.
Take a look at our Assets guide for more information on adding and managing your assets.
Link forms with properties
By linking your forms and documents to specific properties, staff in that property's team can access them whenever they need, right from the Onside app. To start linking, follow the steps below
Link a property to forms
From the web portal, navigate to the property you want to link to documents and forms. Click the 'Documents' tab and then 'Link' to choose what to make available to your property team's staff.
Link forms to properties
From the web portal, click on the 'Documents' option in the side menu and select the document or form you'd like to link. Click the 'Properties' tab to then link to your managed properties.
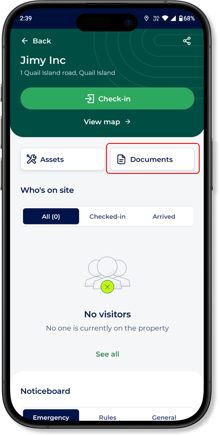
For both methods, once linked, your staff will be able to access the forms from 'Documents' on the property's home page in the Onside app, via the 'My properties' list or by checking in to it.
Setting permissions and access
Each form will have a 'Permissions' tab for you to configure who should be able to view, submit, or edit documents and forms. By default however, property team members will be able to access the forms linked to their respective property.
Depending on the type of user checking in to your properties, you may want to lock down or open up access to your forms. You may want to give view and submit access to all staff, but contractors only access to a specific folder. This is completely configurable as to how you need to run your operation.
You can also set these permissions at a form level or an entire account level by clicking on the 3-dot  button at the top right of the Documents page and selecting 'Permissions'.
From here the permissions can be broken down as follows;
Standard roles
- Company admin
By default, all company admins have full access to all forms within the account - Property admin
Permissions for the forms connected to the properties they're admins of - Property member (team member)
Staff who are part of team(s) linked to properties in your account - Company member
Any staff member in your 'Internal staff' list - Anyone
Teams
Set permissions for individual teams you have created in your account.
Individual users
Set permissions for individual staff members from your account.
External companies
Set permissions for companies external to your own, such as; contractors, visitors, or clients.
The permission options you can set for all the user types listed above are:
- None (cannot view)
- View and submit (can view, but cannot edit)
- Full edit (can edit all fields, create new versions, and view all activity)
Expiry notifications
Expiry notifications can be set at a company, folder, and individual form level.
For each level, follow the steps below on the respective pages (Documents page, folder page, individual form page).
- Click on the 3-dot button to the left of the green button at the top right of the page.
- Click Notifications
- Add the users you'd like to get expiry notifications
Downloading reports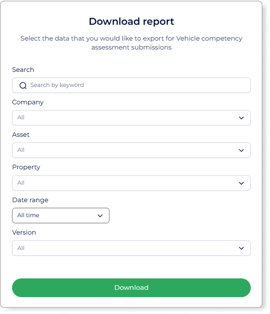
When a form has been used/completed in Onside, we call this a "submission". When you need to generate a report of submissions for the month, such as toolbox meetings your team has submitted, it can be done in three easy steps.
- Click on the form in your Onside web portal
- Click on the button next to 'Edit form' and choose 'Download report'
- A pop up (shown right) will then appear for you to filter the asset submissions for your report. Choose your filters, then click 'Download'.
Tip: If you only need a report for one of your form submissions, click on the submission and use your browser's print option (ctrl + p or Command + P).
Offline functionality
Like many things in Onside, forms can be accessed and completed offline. For this to work however, the user needs to have previously accessed the form when in mobile or wifi reception. From there, it is stored within the app for them to use as they need. Form submissions, like risk and incident reports, will be sent to our servers once the app has signal again.
Advisement: Offline forms do not show form attachments
If you have any questions or need any help, you can reach us on 0800 ONSIDE (NZ), 1800 112334 (AU), or email Support@onside.co
If you have an idea for an improvement to Onside, let us know here.