Every property is unique, and each property in Onside should reflect that. Sometimes there's key information about your property that your visitors need to know, but it isn't necessarily about Health and Safety. That's where the Check-in Rules come in.
So, what can you do with it?
- Set a warning banner to appear to your visitors when they check-in to your property;
- Provide essential information to your visitors for their visit, such as; where to park, which route to take, direction of traffic, rules of entering the property, etc;
- Alert visitors to biosecurity incursions;
- Bring attention to recent events on the property, such as; a bridge has collapsed, a cattle stop has caved in, a tree has fallen over the road, etc.
- Attach PDFs (app only) and image files for your visitors to download.
- Direct visitors to online content.
Note: Check-in Rules requires a Complete or Enterprise subscription.
Below are the step-by-step instructions of how to customize this feature to your specific needs. Alternatively, we also have a video version too.
Customizing your Check-in Rules
1) To start off with, you'll need to login to the web portal as an admin, and have an Onside Complete or Enterprise subscription.
2) Then click on your property, and you'll see a 'Check-in Rules' tab, click that. From here your screen will look like this;

3) Under 'Warning' enter the most critical thing you need your visitors to know, this will be displayed in red in the app when the visitors check in.
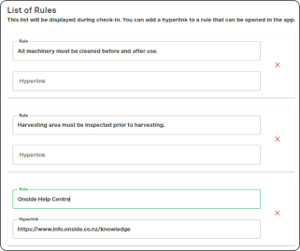
4) Next, enter the details of your Check-in Rules. You can put in up to 120 characters for each rule, but it's best to keep it brief, as you want the visitors to read it thoroughly.
You can also add a website link to the rule. The visitor would be able to tap on it to be taken to what you've put; induction videos, documents, etc.
Note: When adding the hyperlink, you will need the full website address (include http:// or https://).
Note: links can only be access by visitors using the Onside app.
 5) You have the option of adding up to two files to provide further information, such as maps or health and safety documents. These can be in png, jpg, jpeg, and PDF format. Don't forget to add the name of your files above the 'upload' button.
Note: PDFs cannot be opened by visitors using the Kiosk or QR check-in methods. We suggest making your attachment an image in png or jpeg format instead.
6) Now click 'Save', and you're done. When visitors check in to your property they will see a screen like this;

Biosecurity
In my example I have chosen "Please wipe feet on mats...", but as stated above, you can have anything you want. It is especially useful for biosecurity, as you could warn visitors what is present, what they need to do to avoid spreading it, and include further information as an attachment or link to information online.
With the Check-in Rules feature, it is also possible to have any number of documents shared with your visitors. To find out how, follow the steps here.
Copying Property Rules to another property
If you have multiple properties, you can copy your Check-in Rules from one to another, or even to all of your properties at once! Talk about a time saver!
Once you've created your Check-in Rules following the above instructions, simply click on the ![]() button at the top of the page and then select which properties to apply it to.
button at the top of the page and then select which properties to apply it to.
Caution: This will overwrite any rules on the properties you're copying to.
If you have any questions or need any help, you can reach us on 0800 ONSIDE (NZ), 1800 112334 (AU), or email Support@onside.co
If you have an idea for an improvement to Onside, you can add it directly to our product board.