If you've received an email or notification that a visitor has recorded an incident on your property, you'll need to follow up on that promptly. All of the key information will be available to you in the Onside Web Portal, ready for you to start investigating.
Watch the following video to find out more about this process, or follow the steps further below.
Note: Incident management requires a Core or Complete subscription.
Your Incident dashboard
Once you sign in to your Onside website portal, click the 'Health & Safety' then 'Incidents' option in the side-menu to see all incidents associated with your company. If you have an Onside Teams subscription, this dashboard will include incidents your staff have recorded on any Onside property.
With the Incident dashboard you'll be able to filter incidents by selecting the 'Unreviewed', 'Reviewing', and 'Closed ' cards along the top of the screen, and then filter further if required and download a report based on that.
Under the filters you can also sort by column titles, change the incident status, assign an owner and, from the 3-dot button to the right, you can also archive the incident.
.png?width=670&height=84&name=incident%20columns%20(1).png)
Manage an incident
- Click on the property that you are wanting to manage an incident for, then the 'Incidents' tab, then click your incident.
or
Click on the individual incident from your Incident dashboard. - Newly recorded incidents will show with an orange "Unreviewed" status. There are also "Reviewing" and "Closed" statuses available.

- Incidents are broken down into 3 sections:
- Details - Information about the what, where, when, and who of the incident.
- Management - Adding post-incident information such as assigning an owner, when the person is expected to return to work, and investigation notes.
- Action - Identifying actions that can be taken on the property to reduce the chance of this incident happening again, assigning those as tasks to staff, and connecting the incident to a specific risk on the site.
- Read through the information of the incident and update details as required. Some fields will be mandatory to have information for, such as incident title, type of incident, and affected person's details.
- On the Management section it's good practice to include what steps you're taking going forward to prevent this incident again, which can also then be added into the Action section and assigned to staff to undertake.
- When you've investigated an incident and are ready to take it off your dashboard, click on the 3 dot menu to the right of the row to archive it.
Note - Reported incidents cannot be deleted, but can be edited or archived.
Incident alerts and reminders
When an incident is recorded or created, the property admins and company admins will receive an email and Onside notification.
If an incident is assigned to a company member, that person will be advised via email.
From your company settings in the Onside web portal, you can also set reminders for incident owners to follow up on their assigned incident(s).
.png?width=531&height=111&name=Incident%20reminders%20(1).png)
Note: Incidents you create or assign to yourself will not send you an alert.
Activity log
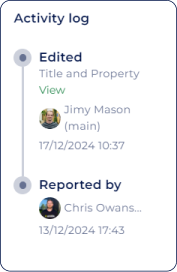
If an incident is changed, you will have a record of the change by clicking on the incident and referring to the activity log to the right of the screen.
Clicking the green 'View' text will also show you exactly what change was made, when, and by whom.
If you have any questions or need any help, you can reach us on 0800 ONSIDE (NZ), 1800 112334 (AU), or email Support@onside.co
If you have an idea for an improvement to Onside, you can add it directly to our product board.